
How to Airbrush: Step by Step
Following the procedure below will help you learn how to airbrush.
Over time you will develop you own favorite procedures, but for now, follow these 9 basic steps:
1) Prep the area Prepare your spray table, or lay down plastic sheets.
2) Prep model Use gloved hands, position the model where you want it. I like to spray undersides first, any issues will be less noticeable and can be corrected before spraying the topside.
3) Prep equipment Turn on the compressor and set the spray pressure. Assemble the needle and nozzle into the airbrush if necessary. Attach a color cup or bottle as appropriate.
4) Get comfy No, seriously. If possible, sit while spraying. If not possible, have a chair handy to sit on between spray coats, to do cleaning and such.
The job will go much easier if you are not bent over the model or ground for an extended period.
5) Mix paints Following the maker's directions, mix the paint with thinner. Use disposable plastic droppers (from the hobby shop) to draw up paint, then thinner, and plastic into a small mixing container.
Use separate droppers for thinner, and for different colors, to avoid contamination. Mix the paint with a toothpick or similar. Note: do not pour paint from the bottle into the mixing container!
This generally leaves dried paint on the bottle rim. The dried paint makes it hard to close the bottle properly, but worse, pieces will fall into the paint. This dried paint can clog the airbrush nozzle!
6) Test spray! Always test spray! Make this a part of your routine. You never know how the initial spray will come out of the nozzle, it will sometimes make a big mess.
Test spray and then make any adjustments to the airbrush, or to the paint mix. Then test again. Including when spraying a repeat coat, as paint may have dried on the nozzle between coats.
Not test spraying is a common mistake that people make when learning how to airbrush, but it only takes one ruined model to change your ways...
Spray on something similar if not identical to your actual subject; that way you can test for color and chemical compatibility, as well as spray pattern.
Use scrap wood, foam or plastic from, prepare it (sanding, and primer coat) as you prepare the rest of the airplane.
Be aware that some paints will eat certain materials. Lacquer and enamels tend to be aggressive, and foam is delicate. So test before spraying on the airplane.
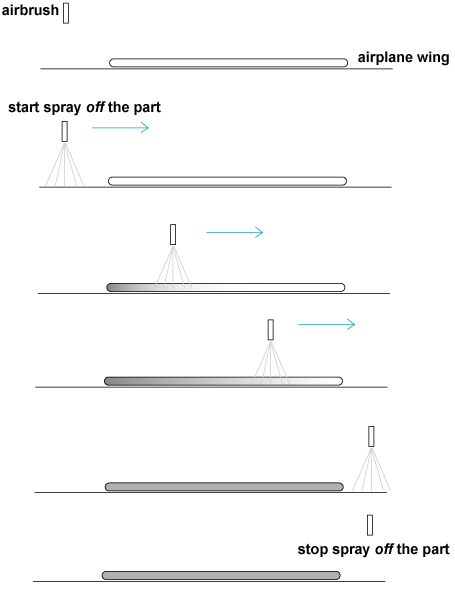
7) SPRAYING Now that you've test sprayed, time for the real thing. Always start and stop the spray off or away from the model. This will result in even coverage on the model.
It will also give you time to abort if you see something strange (e.g. paint splatter) before you ruin the paint coat.
Hold the airbrush at an angle to the model (vertical is not practical), about 6 to 18 inches away.
The distance will depend on the size of the part and the volume of the spray. Again, a test spray on some scrap will help you get a good starting point.
Move smoothly and at an easy pace. (Be careful to not tip over the airbrush too far, or paint may spill from the color cup).
8) Multiple Coats Your first coat will be just a light dusting. Make several passes, but do not attempt to actually cover completely with color.
Just go for a uniform light dust of paint. E.g. if the paint color is dark blue going over white foam, the first coat will look like speckles of medium blue.
Light is the keyword. The idea is to get just enough fairly uniform coverage so that subsequent coats will "bite" into the first coat. If you try to cover in only coat, you will usually get an uneven mess.
Follow the manufacturer's recommendation on length of time between coats. I usually wait 20-30 min for acrylics and a hour for enamels.
The follow-up coats can be much more "wet" than the first coat, but you should still expect to take at least 3-4 coats to get good even color coverage. Don't rush it.
Photo Sequence - How to Airbrush Multiple Coats.
9) Clean Up Do not omit this step. Clean up when changing colors, and when you're done for the day. See the Airbrush Cleanup link below for more details.