
Scale Models - Panel Lines
Panel lines are simply the lines where an airplane's surface panels join together. The joints can be seen on the full-size airplane. Duplicating these lines on rc scale models can create a strong sense of realism.
The main challenge is knowing where to make the lines on the model.
Use a 3-view from a book, or a scale plastic kit, as a guide. It's tempting to simply start drawing lines on the model, but you could run out of space, or make the lines on one wing-half look different than the other.
Find the scale factor: measure a distance on the model and divide that by the corresponding distance on the 3-view (e.g. the span of the wings).
Now if you measure the distance between any two points on the 3-view, simply multiply by the scale factor to know the distance on your model.
Use straight rulers to draw most of the lines. You will also need a flexible ruler (from the drugstore or stationery store) to go around curves.
Use pens and pencils to create the panel lines. Some people just go to town with a fine-tipped black ink Sharpie, and call it good enough. However, black ink is usually too strong contrast.
We draw our panel lines with gray pencils of varying shades, silver paint or gel pen, and black pen.
The gray pencils are Sanford Prismacolor (e.g. 30%warm and 70%cool), the silver gel pen is Sanford Uniball Gel, paint pen is Sakura Pen-Touch silver, and black is a Sanford Uniball.
These items should be available in your stationery or craft store (e.g. Michael's). Practice on scrap material (or in a small inconspicuous spot on the model) to get the feel of how each item delivers color/paint.
Use light panel lines over dark background, dark over medium or light background. Change the pen/pencil color when going from one background color to the other, or across a decal.
Not hard, just time-consuming.
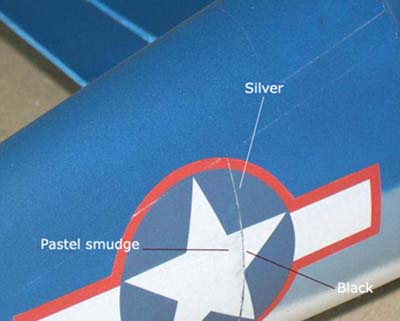
The final effect will be a lot more satisfying than uniform stark black panel lines. Note how in the decal below, the vertical panel line changes color from silver (red and blue background) to black (white background in the star).
You can also see a pastel smudge that is part of the scale weathering applied.
The final step is to seal the panel lines with a clear overcoat. This may be acrylic, enamel or lacquer (depending on the paint coats), and could be gloss, semi-gloss or flat (depending on the full-scale airplane).
If you want your airplane to look factory fresh, you're done at this point. If you'd like it to have a realistic weather-beaten or war-torn finish, proceed to the Weathering guide.